

27 Sep How to Repair and Maintain Bootfoot Chest Waders
Key Takeaways
- Finding a leak early prevents small problems from becoming major failures.
- Isopropyl alcohol helps you locate hidden pinhole leaks quickly.
- Aquaseal and Tenacious Tape both work well for patching holes.
- Proper drying and storage extend your waders’ overall lifespan.
- Regular boot care prevents cracking and separation over time.
Bootfoot chest waders take a beating on every fishing trip. However, as the gear specialists at https://crazyfishinggear.com/ warn, ignoring early wear is the fastest way to ruin a good pair, while proper repair and care extend their working life significantly. Small leaks and worn boots do not mean instant replacement. This guide shows you how to fix and maintain your waders. You will stay dry and comfortable for many seasons ahead.
Why Wader Maintenance Matters
Waders face constant stress from rocks, branches, and rough terrain. Without care, small problems turn into major leaks quickly. Therefore, regular maintenance saves you money and frustration over time.
A single pinhole leak can ruin an entire day of fishing. Cold water seeping into your boot distracts you from the task at hand. Additionally, prolonged exposure to cold water raises your risk of discomfort or illness.
Bootfoot waders combine two materials that wear differently over time. The rubber boot and the fabric leg each need separate attention. Neglecting either part shortens the useful life of the whole garment.
According to Field & Stream, most small rips and pinhole leaks are simple enough for anglers to repair themselves at home. This means most wader problems do not require expensive replacement. Learning basic repair skills saves real money across many fishing seasons.
Proper care also protects your investment in quality gear. Waders represent a real cost for many anglers and families. Therefore, treating them well extends their value well beyond the first few uses.
Common Signs Your Waders Need Repair
Recognizing damage early makes repairs easier and more effective. Watch for these common warning signs during regular gear checks.
- Damp socks or pant legs after a day on the water
- Visible cuts, punctures, or worn spots on the fabric
- Cracking or splitting rubber around the boot area
- Separation where the boot meets the fabric leg
- A musty smell suggesting trapped moisture inside
Damp socks often signal the first sign of a hidden leak. Many anglers notice this before finding any visible damage. Therefore, treat wet socks as a clear signal to inspect your gear.
Cracking rubber usually appears first around flex points near the ankle. This area bends constantly during walking and wading. Consequently, it wears faster than flatter, less-flexed sections of the boot.
Boot and leg separation represents a more serious repair challenge. This damage often develops slowly from repeated stress at the seam. Catching it early prevents a complete failure during a fishing trip.
Finding a Hidden Leak
Locating a leak often proves harder than fixing it. Follow these steps to find even the smallest pinhole.
- Wear your waders in water for several minutes.
- Remove them and check for damp spots inside.
- Turn the waders inside out for a closer look.
- Spray isopropyl alcohol lightly over the suspected area.
- Watch for small, dark spots appearing on the surface.
- Circle the leak location with a marker or chalk.
Step four works because alcohol reveals hidden holes almost instantly. The liquid seeps through tiny openings invisible to the naked eye. As a result, dark spots appear exactly where repairs are needed.
Marking the leak immediately prevents a common frustration among anglers. Many people lose track of a pinhole once waders dry out. Therefore, always mark the spot before setting the waders aside.
Take your time during this search process, even if it feels tedious. Missing a small leak means repeating the entire process later. A careful search now saves effort during your next repair session.
Repairing Pinholes and Small Punctures
Small punctures respond well to simple, at-home repair methods. Follow these steps once you have located the damage.
- Clean and dry the waders thoroughly before starting.
- Turn the waders inside out for easier access.
- Draw a circle around the leak, slightly larger than the hole.
- Apply Aquaseal FD to the marked area using the brush provided.
- Let the sealant cure fully for about 24 hours.
- Test the repair in water before your next fishing trip.
According to Field & Stream, pinholes can be difficult to repair because they are hard to locate. This makes the marking step from the previous section especially important. Skipping it often leads to repeated, frustrating searches later.
Curing time matters more than many anglers expect during this process. Rushing the process before full cure weakens the repair significantly. Therefore, plan your repair a full day before any planned trip.
Test your finished repair before relying on it in the field. A quick dip in a tub or pool confirms the fix worked. This small step prevents an unpleasant surprise during your next outing.
Repairing Larger Rips and Tears
Bigger tears need a patch in addition to sealant alone. Follow these steps for a durable, long-lasting repair.
- Clean and dry the torn area completely.
- Turn the waders inside out for the repair process.
- Trim a patch to size, with smooth, rounded edges.
- Apply Aquaseal around the tear and press the edges together.
- Once tacky, place the patch firmly over the damaged area.
- Press from the center outward to avoid trapping air bubbles.
- Allow the repair to cure for about 24 hours.
Rounded patch edges matter more than they might first appear. Field & Stream notes that jagged or sharp corners on a patch can peel up more easily over time. Therefore, always round the corners before applying any patch material.
Pressing from the center outward prevents trapped air pockets underneath. Air bubbles weaken the bond and create new leak points. A firm, steady pressing motion produces the most reliable seal.
Tenacious Tape offers a faster alternative for smaller emergency repairs. Apply adhesive to the inside and tape to the outside surface. However, a proper patch and Aquaseal combination lasts longer overall.
Caring for the Boot Portion
The rubber boot section needs different care than the fabric leg area. Follow these tips to prevent cracking and premature wear.
- Avoid drying boots in direct sunlight whenever possible
- Store waders indoors in a climate-controlled space
- Apply rubber conditioner regularly to prevent drying out
- Consider a protective coating for extra durability
- Check boots for cracks before every fishing season
Sunlight breaks down rubber compounds faster than most anglers realize. UV rays cause the material to dry, crack, and eventually fail. Therefore, always dry and store your waders away from direct light.
Rubber conditioner replaces oils lost through normal use and aging. Applying it regularly keeps the boot flexible and crack-resistant. This small habit adds real years to your wader’s useful life.
Some anglers add a protective coating to new boots immediately. This extra layer guards against small cuts and abrasion damage. It also helps seal minor cracks before they grow into leaks.
Proper Storage Between Fishing Trips
Correct storage prevents damage that even careful repairs cannot fix. Follow these steps to protect your waders long term.
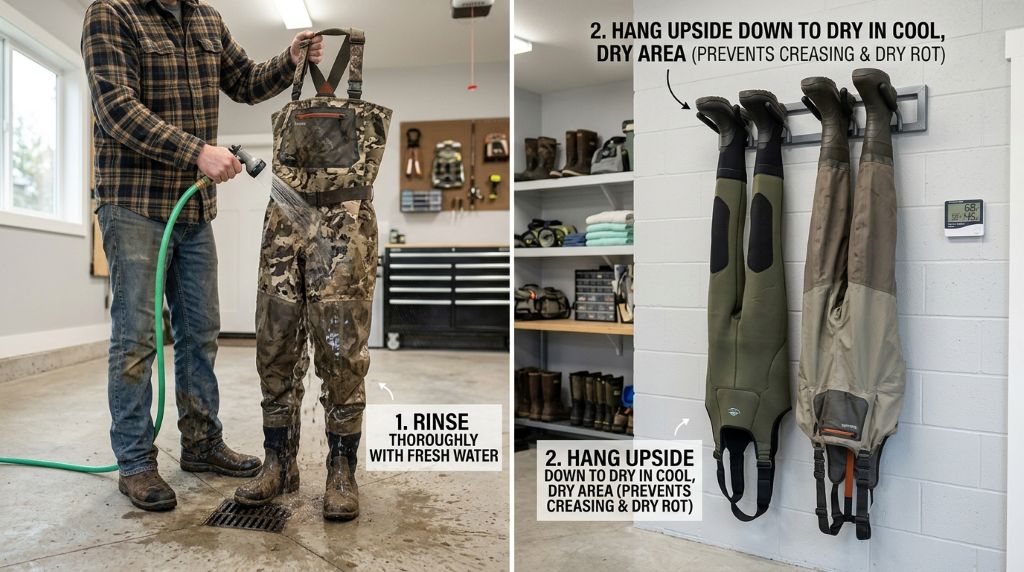
- Rinse your waders thoroughly after every fishing trip.
- Hang them with the boots facing upward for airflow.
- Store them in a shaded, climate-controlled indoor space.
- Avoid folding waders tightly for extended storage periods.
- Check stored waders periodically during the off-season.
Hanging with boots upward allows air to circulate through the entire garment. This position speeds drying and prevents trapped moisture buildup. Standing water inside boots often causes odor and material breakdown.
Climate control matters more than many anglers expect for storage. Extreme heat or cold both stress rubber and fabric materials. Therefore, an indoor closet or climate-controlled garage works best.
Avoid cramming waders into tight storage bags for months at a time. Constant folding creates stress points that crack over time. A loose hang or gentle fold protects the material far better.
Conclusion
Repairing and maintaining bootfoot chest waders keeps you dry and comfortable for years. Find leaks early, patch them properly, and care for the rubber boots regularly. Store your waders correctly between trips to prevent unnecessary damage. These habits protect your investment and your comfort on the water, especially when preparing for different fishing conditions, such as how to rig the perfect surf fishing setup for pompano.
A few minutes of care after each trip pays off during your next outing. Do not wait for a major leak to start good habits now. Inspect your waders today, patch any small damage, and store them properly for your next fishing adventure.
Frequently Asked Questions
Can I repair waders myself, or do I need a professional?
Most small leaks and tears are simple enough to fix yourself. Larger damage may need the manufacturer’s repair service.
How long does Aquaseal take to fully cure?
Aquaseal typically needs about 24 hours to cure fully. Avoid using your waders until the repair dries completely.
Why do my wader boots crack after storage?
Sunlight and dry conditions cause rubber to crack over time. Store boots indoors and apply rubber conditioner regularly.
What is the best way to find a hidden leak?
Spray isopropyl alcohol on suspected areas and watch closely. Dark spots reveal the exact location of small leaks.
How often should I check my waders for damage?
Inspect your waders before every season and after rough trips. Catching small leaks early prevents bigger repair problems.
Sorry, the comment form is closed at this time.