07 Aug Basic Way to Bike Wheel truing Lateral Only
Basically, at home or in the shop or garage wheel truing, gonna address the side to side. So, if you get a spin and do you get a little movement to the left or the right?
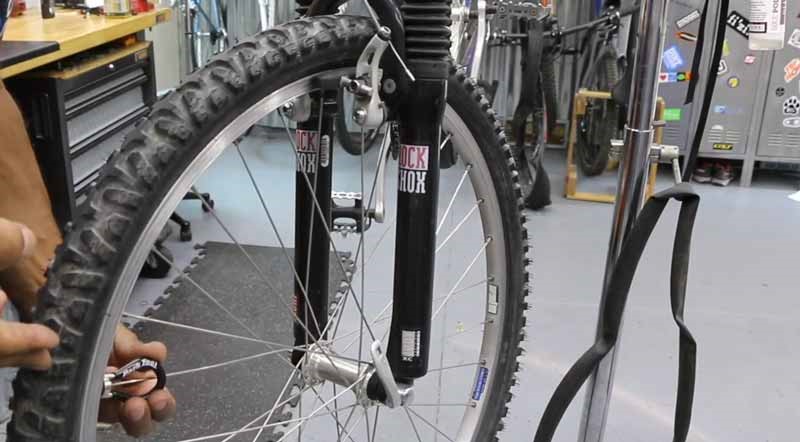
We hit something and you don’t have a truing stand. We’re going to be able to do it and basically touch upon it while it’s on the bike so let’s go and start our journey to the bike wheel truing.
Braking System
This is a sidewall braking system and it may not be perfect, not like a regular train stand, but we’ll be able to get you. Straight enough to maybe not rubbing on the brakes and all that good stuff.
What I’m going to do is I’m going to go ahead and go ahead and use the sidewall or the brake side brake here as my marker, my caliber to find where my rub is.
So if I give it a spin wheel is going to be moving over to the one side. Just establish if it’s your left or your right side. Here you can also learn how to true a bike wheel.
Then once you find that rub, if you need to, you can go ahead and tighten up your brakes, use your barrel adjuster, tighten up your brakes.
That’ll help bring the brake pad closer. So you can be a little finer to find that where that rubber is so established either.
You’re going to look for it visually, or you’re going to listen. I like to do both find the center of that rubs. You won’t establish where that rub is.
This one is over. If I’m standing looking forward at it, this is on my right, but if I’m sitting on the bike, it’s going to be the left side.
If you get it perfect to where you give it a spin, let the wheels slow down a little bit. Eventually, The wheel will stop, right?
Where you’re, most of your rubber is. So you can look at that and it’s this isn’t a perfect science, but you’re choosing the, spoke that somewhat in the middle of that brake pad where you can kind of move back a little bit.
Now it’s time to finding the center of that rubber boom starts there starts right about here and then I feel it, let go right about there.
So from here to here and then, we’ll find the center of that road, which is right about here. So my rub is on this side and I follow the spoke down to follow this, spoke down.
The spoke is going down to my left side of the flange. This is the same side as my rub is on.
So I do not want to tighten the spoke. If I tighten this spoke and it’s going to do is make the wheel, pull that direction, and rubbed his break more.
If you are going to choose this, the spoke on the other side and just make sure that’s still the center or close to the center of your brother and this guy being the center of the rub, we need to find two spokes on the other side.
Spoke
If I choose these two over here then these two are going over to the right side of my which is the opposite side of my rub and so I’m going to tighten these two and loosen the metal.
Make sure you find the right side spoke wrench and you want a nice tight fit nothing loose and so we’re tightening this spoke.
Pretend we have a screwdriver coming in the backside and we’re tightening clockwise. And just turn your spoke wrench the same way. So if I’m turning clockwise here, this spoke wrench.
Needs to follow the same direction, just like that. So if moving left or right, it needs to go the same direction in this case, we’re going to the right and you should be in a good spot there.
We’re tightening this guy when in doubt or tightening clockwise, just like this and this guy’s really, really new.
It could almost sneeze on it and they’ll come with something to give it another turn right there. So that’s one full turn right there.
I’m going to do this one here only because actually I use loosened one of these for learning and teaching purposes on this article.
After you tighten about a quarter to a half turn then you’re going to test it again. Just like anything it’s going to be patient, give it a spin and your rubs should be less or almost disappearing.
Then visually it shouldn’t be moving over to that right side or left side, hitting that brake pad. So just continue that process.
Then here’s the S the second method for using a two or three-spoke method, finding the center of that rub.
It’s like right about there. So say it’s this guy here and this is going over to the opposite side of my rub. The rub is on this side. DE spoke is over on the left the opposite side.
So I’m going to use this one to tighten. So you would tighten this a quarter turn and then you would go to the two outside spokes, which are going over to the same side as your rub, and then you would release tension.
So instead of going clockwise, pretending you have a screwdriver here, instead of going clockwise like this, we’re going to go counterclockwise and make sure this tool follows the same direction as this hand.
So we’re going this direction just like that quarter and turn to skip a spoke. Make sure you get the next spoke that is on the same side as that flange that you just we’re one down and tight.
If you find that nipples rounded off so rounded off you might have to replace them. You might have to pull your tire and tube off, take the tire liner off, replace that one nipple again. We’re going to be loosening.
So we’re going, counter-clockwise following this hand here, just like that boom and then you should give it another spin.
It shouldn’t be quieter or slowly getting quiet cause we’re just doing small increments. We don’t want to overdo anything and just keep doing that until you visually don’t see that big movement over hitting the brake pad.
Conclusion
In this article, we have described an amazing way to bike wheel truing. Here we have tried our best to give an optimal solution to how you can true your bike wheel so if you want to learn more check OutdoorXports and if you think this article is good enough then share it as you can.
Sorry, the comment form is closed at this time.